Using advance JS and webRTC for cross browser communications in real time
To implement features such as audio/video chat or some other features in websites that require real-time peer-to-peer (browser-to-browser) data transfer, or need to retrieve audio/video stream from a microphone, webcam, or any other device, we had to use browser plugins such as Java and Flash. There are various issues with making websites depend on browser plugins, such as mobile browsers not supporting plugins and plugins requiring to be kept up to date. Therefore, WebRTC was introduced to solve these problems, that is, browsers that support WebRTC provide APIs to exchange data in real time directly between browsers and also retrieve stream from physical media sources without the use of plugins. In this article, we will discuss WebRTC and also the PeerJS library that wraps the WebRTC APIs to provide an easy to use API to work with WebRTC.
In this article, we’ll cover the following topics:
- Discussing various APIs provided by WebRTC
- Retrieving stream from physical media input devices
- Displaying a media stream
- Discussing protocols used by WebRTC
- Exchanging media stream and arbitrary data between peers using PeerJS
- Discussing topics related to the fundamentals of WebRTC and PeerJS
Terminologies
Before we get into WebRTC and PeerJS, you need to know the meaning of some terms that we are going to use. These terms are discussed in the following sections.
Stream
A stream is a sequence of any kind of data that is made available over time. A stream object represents a stream. Usually, an event handler or callback is attached to the stream object, which is invoked whenever new data is available.
A media stream is a stream whose data is either audio or video. Similarly, a media source is a physical device, file, or something that provides data that is audio or video. A media consumer is also a physical device, API, or something that uses media stream.
Peer-to-peer network model
Peer-to-peer model is the opposite of the client-server model. In the client-server model, the server provides resources to the clients, whereas in peer-to-peer model, every node in the network acts as a server and client, that is, every node provides and consumes resources. Peers in the peer-to-peer model communicate with each other directly.
To establish a peer-to-peer connection, we need a signaling server, which is used for signaling. Signaling refers to the exchange of data by peers that is required to establish a peer-to-peer connection. Data such as session control messages, network configuration, and so on is required to establish a peer-to-peer connection.
A signaling server implements a signaling protocol such as SIP, Jingle, or some other protocol.
A model is selected depending on the requirements and resource availability for the application. Let’s consider some examples:
- To build a video chat app, we should use the peer-to-peer model instead of the client-server model. As each node, in this case, is going to produce a lot data (or frames), and send the data to other node in real time, the server requires a lot of networks and other resources, increasing the server running cost. So, the peer-to-peer model is the best option for a video chat app. For example, Skype video chat is based on the peer-to-peer model.
- To build a text chat app that stores messages in a centralized database, we should use the client-server model as the amount of data that a client produces is not very high and you would also want to store the messages in a centralized database. For example, the Facebook messenger is based on the client-server model.
Real-time data
Real-time data is the data that needs to be processed and transferred without much delay. For example, video chatting, live analytics, live stock price, live streaming, text chat, live score, online multiplayer game data, and so on are all real-time data.
Real-time data transfer is a difficult task to achieve. The techniques and technologies used for real-time data transfer depend on the amount of data and whether the loss of data during data transfer is tolerable or not. If the real-time data is large, and
the loss of data is intolerable, then it requires a lot of resources to achieve real-time data transfer, making it practically impossible to achieve real-time data transfer. For example, while video chatting, every user generates a lot of frames. If some frames are lost, then it is tolerable, therefore in this case, we can use the UDP protocol as
a transport layer protocol that is unreliable and also has less overhead than TCP, making UDP very suitable for video chat application.
Introduction to WebRTC
Web Real-Time Communications (WebRTC) is a browser technology that enables retrieval of media stream of physical media sources and exchange media stream or any other data in real time. It comprises of three APIs: the MediaStream constructor, RTCPeerConnection constructor, and RTCDataChannel interface.
In short, MediaStream is used to retrieve the stream of physical media source, RTCPeerConnection is used to exchange MediaStream among peers in real time, and finally, RTCDataChannel is used to exchange arbitrary data among peers.
Let’s see how these APIs work.
MediaStream API
Two main components of MediaStream API are the MediaStream constructor and
MediaStreamTrack interface.
A track represents the stream of a media source. A track implements the MediaStreamTrack interface. A track can either be an audio track or be a video track. That is, a track attached to an audio source is an audio track, and a track attached to a video source is a video track. There can be multiple tracks attached to a particular media source. We can also attach constraints to a track. For example, a track attached to a webcam can have constraints such as the minimum video resolution and FPS. Each track has its own constraints.
You can change the constraints of a track after it’s created using the applyConstraints() method of the MediaStreamTrack interface. You can retrieve the constraints applied to a track anytime using the getSettings() method of the MediaStreamTrack interface. To detach a track from a media source, that is, to stop the track permanently, we can use the stop() method of the MediaStreamTrack interface. To pause a track, that is, to stop the track temporarily, we can assign false to the enabled property of the MediaStreamTrack interface.
A track can either be a local or remote track. A local track represents the stream of a local media source; whereas, a remote track represents the stream of a remote media source. You cannot apply constraints to the remote track. To find whether a track is local or remote, we can use the remote property of the MediaStreamTrack interface.
A MediaStream holds multiple tracks together. Technically, it doesn’t do anything. It just represents a group of tracks that should be played, stored, or transferred together in a synchronized manner.
The getSources() method of the MediaStreamTrack object allows us to retrieve the ID of all the media devices, such as speakers, microphones, webcams, and so on. We can use the ID to create a track if the ID represents a media input device. The following is an example that demonstrates this:
MediaStreamTrack.getSources(function(sources){ for(var count = 0; count < sources.length; count++)
{
console.log(“Source ” + (count + 1) + ” info:”); console.log(“ID is: ” + sources[count].id);
if(sources[count].label == “”)
{
console.log(“Name of the source is: unknown”);
}
else
{
console.log(“Name of the source is: ” + sources[count].label);
}
console.log(“Kind of source: ” + sources[count].kind);
if(sources[count].facing == “”)
{
console.log(“Source facing: unknown”);
}
else
{
console.log(“Source facing: ” + sources[count].facing);
}
}
})
The output will vary for everyone. Here is the output I got:
Source 1 info:
ID is:
0c1cb4e9e97088d405bd65ea5a44a20dab2e9da0d298438f82bab57ff9787675
Name of the source is: unknown Kind of source: audio
Source facing: unknown Source 2 info:
ID is: 68fb69033c86a4baa4a03f60cac9ad1c29a70f208e392d3d445f3c2d6731f478 Name of the source is: unknown
Kind of source: audio Source facing: unknown Source 3 info:
ID is: c83fc025afe6c7841a1cbe9526a6a4cb61cdc7d211dd4c3f10405857af0776c5 Name of the source is: unknown
Kind of source: video Source facing: unknown
navigator.getUserMedia
There are various APIs that return MediaStream with tracks in it. One such method is navigator.getUserMedia(). Using navigator.getUserMedia(), we can retrieve a stream from media input sources, such as microphones, webcams, and so on.
The following is an example to demonstrate:
navigator.getUserMedia = navigator.getUserMedia || navigator. webkitGetUserMedia || navigator.mozGetUserMedia;
var constraints = { audio: true, video: {
mandatory: { minWidth: 640,
minHeight: 360
},
optional: [{ minWidth: 1280
}, {
minHeight: 720
}]
}
}
var av_stream = null;
navigator.getUserMedia(constraints, function(mediastream){ av_stream = mediastream; //this is the MediaStream
}, function(err){
console.log(“Failed to get MediaStream”, err);
});
When you run the preceding code, the browser will display a popup seeking permission from the user. The user has to give the permission to the code to access the media input devices.
By default, the media input devices to which the tracks are attached while using getUserMedia() depends on the browser. Some browsers let the user choose the audio and video device that they want to use, while other browsers use the default audio and video devices listed in the operating system configuration.
We can also provide the sourceId property assigned to the ID of the media input device in the constraint object’s audio or video property’s mandatory property to make getUserMedia() attach tracks to these devices. So, if there are multiple
webcams and microphones, then you can use MediaStreamTrack.getSources() to let the user choose a media input device and provide this media input device ID to getUserMedia() instead of relying on the browser, which doesn’t guarantee whether it will let the user choose a media input device.
The first parameter that it takes is a constraint object with audio and video track
constraints. Mandatory constraints are those constraints that must be applied. Optional indicates that they are not very important, so they can be omitted if it’s not possible to apply them.
Some important constraints of an audio track are volume, sampleRate, sampleSize, and echoCancellation. Some important constraints of a video track are aspectRatio, facingMode, frameRate, height, and width. If a constraint is not provided, then its default value is used.
You can simply set the audio or video property to false if you don’t want to create the audio or video tracks respectively.
We can retrieve the tracks of MediaStream using the getTracks() method of MediaStream. Similarly, we can add or remove a track using the addTrack() and removeTrack() methods, respectively. Whenever a track is added, the onaddtrack event is triggered. Similarly, whenever a track is removed, the onendtrack is triggered.
If we already have some tracks, then we can directly use the MediaStream constructor to create MediaStream with the tracks. The MediaStream constructor takes an array of tracks and returns MediaStream with the reference of the tracks added to it.
An API that reads data from tracks of MediaStream is called a MediaStream consumer. Some of the MediaStream consumers are the <audio> tag, <video> tag, RTCPeerConnection, Media Recorder API, Image Capture API, Web Audio API, and so on.
Here is an example that demonstrates how to display data of tracks of MediaStream
in the video tag:
<!doctype html>
<html>
<body>
<video id=”myVideo”></video>
<br>
<input value=”Pause” onclick=”pause()” type=”button” />
<script type=”text/javascript”> navigator.getUserMedia = navigator.getUserMedia ||
navigator.webkitGetUserMedia || navigator.mozGetUserMedia;
var constraints = { audio: true, video: true
}
var av_stream = null;
navigator.getUserMedia(constraints, function(mediastream){ av_stream = mediastream;
document.getElementById(“myVideo”).setAttribute(“src”, URL.createObjectURL(mediastream));
document.getElementById(“myVideo”).play();
}, function(err){
console.log(“Failed to get MediaStream”, err);
});
function pause()
{
av_stream.getTracks()[0].enabled =
!av_stream.getTracks()[0].enabled; av_stream.getTracks()[1].enabled =
!av_stream.getTracks()[1].enabled;
}
</script>
</body>
</html>
Here we have a <video> tag and a button to pause it. A video tag takes a URL and displays the resource.
To display the output of MediaStream in the <video> tag, we need to use the URL. createObjectURL() method, which takes a blob, file object, or MediaStream and provides a URL to read its data. URL.createObjectURL() takes extra memory and CPU time to provide access to the value passed on to it via a URL, therefore, it is wise to release the URL using URL.revokeObjectURL() when we don’t need the URL anymore.
If there are multiple audio and video tracks in MediaStream, then <video> reads the first audio and video tracks.
RTCPeerConnection API
RTCPeerConnection allows two browsers to exchange MediaStream in real time.
RTCPeerConnection is an instance of the RTCPeerConnection constructor.
Establishing peer-to-peer connection
For a peer-to-peer connection to be established, a signaling server is needed. Through the signaling server, the peers exchange data required to establish a peer-to-peer connection. Actual data transfer takes place directly between peer-to-peer. The signaling server is just used to exchange pre-requirements to establish a peer-to-peer connection. Both the peers can disconnect from the signaling server once the peer-to-peer connection has been established. The signaling server doesn’t need to be a highly configured server as the actual data is not transferred through it. Data transfer for a single peer-to-peer connection will be in some KB,
so a decent server can be used for signaling.
A signaling server usually uses a signaling protocol, but it is also okay if it’s an HTTP server as long as it can pass messages between two peers. WebRTC doesn’t force us to use any particular signaling protocol.
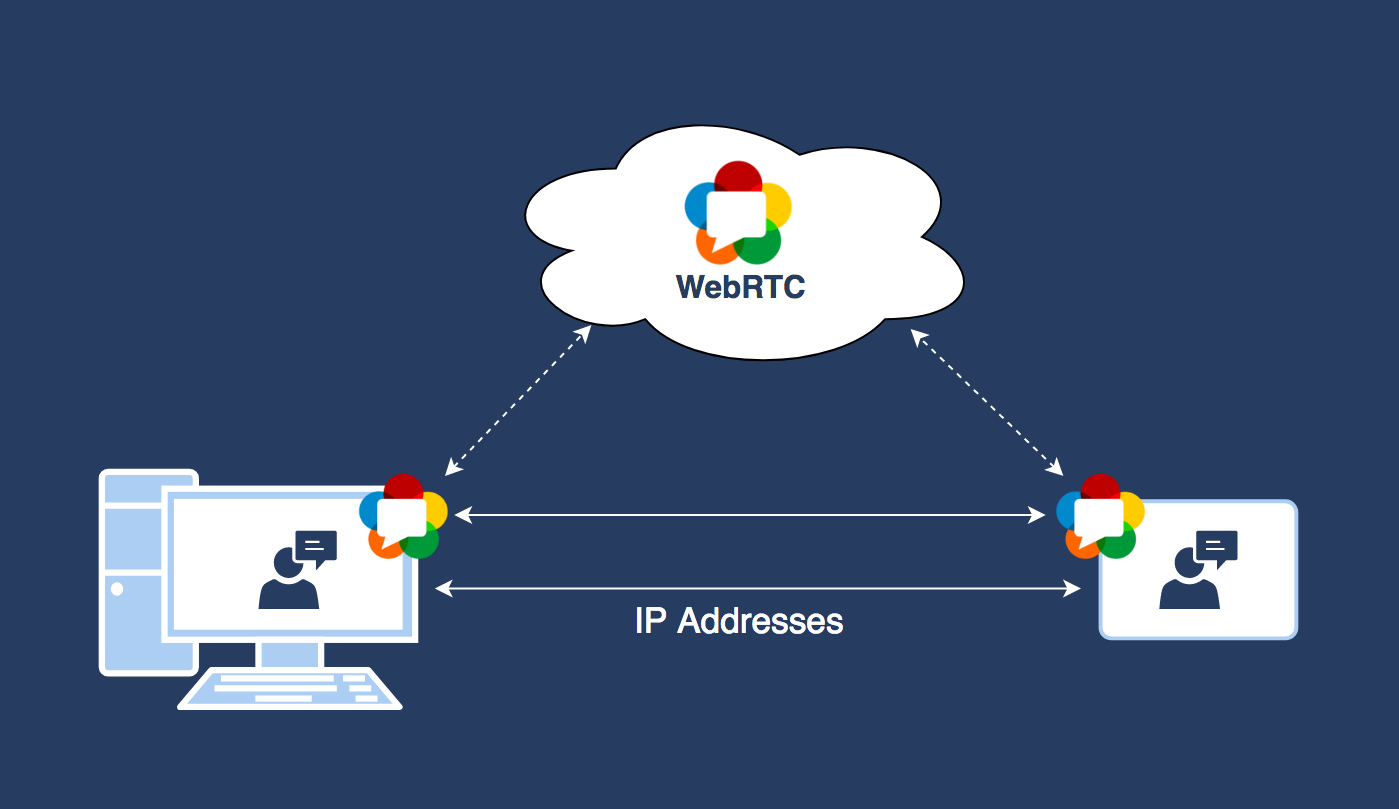
For example, say that there are two users, Alice and Bob, on two different browsers. If Alice wants to establish a peer-to-peer connection with Bob for chatting, then this is how a peer-to-peer connection would be established between them:
- They both will connect to a signaling server.
- Alice will then send a request to Bob via the signaling server, requesting to chat.
- The signaling server can optionally check whether Alice is allowed to chat with Bob, and also if Alice and Bob are logged in. If yes, then the signaling server passes the message to Bob.
- Bob receives the request and sends a message to Alice via the signaling server, confirming to establish a peer-to-peer connection.
- Now both of them need to exchange messages related to session control, network configuration, and media capabilities. All these messages are exchanged between them by the RTCPeerConnection. So, they both need to create an RTCPeerConnection, initiate it, and attach an event handler to RTCPeerConnection that will be triggered by RTCPeerConnection when it wants to send a message via the signaling server. RTCPeerConnection
passes the message to the event handler in the Session Description Protocol (SDP) format, and the messages for the RTCPeerConnection received from the signaling server must be fed to RTCPeerConnection in the SDP format, that is, RTCPeerConnection only understands the SDP format. You need to use your own programming logic to split custom messages and messages for RTCPeerConnection.
The preceding steps seem to have no problem; however, there are some major problems. The peers may be behind a NAT device or firewall, so finding their public IP address is a challenging task, sometimes it is practically impossible to find their IP address. So, how does RTCPeerConnection find an IP address of the peers when they may be behind a NAT device or firewall?
RTCPeerConnection uses a technique called Interactive Connectivity Establishment (ICE) to resolve all these issues.
ICE involves Session Traversal Utilities for NAT (STUN) and Traversal Using Relays around NAT (TURN) server to solve the problems. A STUN server is used to find the public IP address of a peer. In case the IP address of a peer cannot be found, or due to some other reason a peer-to-peer cannot be established, then a TURN server is used to redirect the traffic, that is, both the peers communicate via the TURN server.
We just need to provide the addresses of the STUN and TURN servers and RTCPeerConnection handles the rest. Google provides a public STUN server, which is used by everyone. Building a TURN server requires a lot of resources as the actual data flows throw it. Therefore, WebRTC makes it optional to use a TURN server. If RTCPeerConnection fails to establish a direct communication between two peers and a TURN server is not provided, there is no other way for the peers to communicate and a peer-to-peer connection establishment fails.
Transferring MediaStream
We saw how RTCPeerConnection establishes a peer-to-peer connection. Now, to transfer MediaStream, we just need to pass the reference of MediaStream to RTCPeerConnection and it will transfer MediaStream to the connected peer.
The following are some of the things you need to know regarding the transfer of
MediaStream:
- RTCPeerConnection uses SRTP as an application layer protocol and UDP as a transport layer protocol to transfer MediaStream. SRTP is designed for media stream transfer in real time.
- UDP doesn’t guarantee the order of packets, but SRTP takes care of the order of the frames.
- The Datagram Transport Layer Security (DTLS) protocol is used to secure the MediaStream transfer. So, you don’t have to worry about the security while transferring MediaStream.
- Constraints of the tracks that the remote peer receives may be different from the constraints of the local tracks, as RTCPeerConnection modifies the stream automatically, depending on the bandwidth and other network factors to speed up the transfer, achieving real-time data transfer. For example, RTCPeerConnection may decrease the resolution and frame
rate of video stream while transferring.
- If you add or remove a track from MediaStream that is already being sent, then RTCPeerConnection updates MediaStream of the other peer by communicating to the other peer via the signaling server.
- If you pause a track that is being sent, then RTCPeerConnection pauses transfer of the track.
- If you stop a track that is being sent, RTCPeerConnection stops the transfer of the track.
RTCDataChannel API
RTCDataChannel is used to transfer data other than MediaStream between peers to transfer arbitrary data. The mechanism to establish a peer–to-peer connection to transfer arbitrary data is similar to the mechanism explained in the earlier section.
RTCDataChannel is an object that implements the RTCDataChannel interface.
The following are some of the things you need to know regarding RTCDataChannel:
- RTCDataChannel uses SCTP over UDP as a transport layer protocol to transfer data. It doesn’t use unlayered SCTP protocol as the SCPT protocol is not supported by many operating systems.
- SCTP can be configured for reliability and delivery order, unlike UDP, which is unreliable and unordered.
- RTCDataChannel also uses DTLS to secure data transfer. So, you don’t have to worry about the security at all while transferring data via RTCDataChannel.
WebRTC applications using PeerJS
PeerJS is a client-side JavaScript library that provides an easy-to-use API to work with WebRTC. It only provides an API to exchange MediaStream and arbitrary data between peers. It doesn’t provide an API to work with MediaStream.
PeerServer
PeerServer is an open source signaling server used by PeerJS to establish a peer-to-peer connection. PeerServer is written in Node.js. If you don’t want to run your own PeerServer instance, then you can use PeerServer cloud, which hosts PeerServer for public use. PeerServer cloud allows you to establish a maximum of 50 concurrent connections for free.
A unique ID identifies every peer connected to PeerServer. PeerServer itself can generate the ID, or else the peers can provide their own ID. For a peer to establish a peer-to-peer connection with another peer, it just needs to know the other peer’s ID.
You might want to run your own PeerServer instance when you want to add more functionality to PeerServer or you want to support more than 50 concurrent connections. For example, if you want to check whether the user is logged in to PeerServer, then you need to add this feature and host your own customized PeerServer.
In this article, we will use PeerServer cloud, but in the next article, we will create our own instance of PeerServer. Therefore, to continue further with this article, create an account on the PeerServer cloud and retrieve the API key. Every application gets an API key to access the PeerServer cloud. If you are hosting your
own PeerServer, then you won’t need an API key. The API key is used by PeerServer cloud to track the total connections established by an application. To create an account and retrieve an API key, visit http://peerjs.com/peerserver.
PeerJS API
Let’s discuss the PeerJS API by creating a simple app that allows the users to exchange video and text messages with any user whose ID they have.
Create a peerjs-demo directory in your web server and place a file named
index.html in it.
In the index.html file, we need to first enqueue the PeerJS library. Download PeerJS from http://peerjs.com/. At the time of writing, the latest version of PeerJS was 0.3.14. I would recommend that you stick to this version for the following examples. Place this starting code in the index.html file:
<!doctype html>
<html>
<head>
<title>PeerJS Demo</title>
</head>
<body>
<!– Place HTML code here –>
<script src=”peer.min.js”></script>
<script>
//place JavaScript code here
</script>
</body>
</html>
Here, I enqueued the minified version of PeerJS.
PeerJS API comprises of three main constructors, as follows:
- Peer: An instance of Peer represents a peer in the network. A peer is connected to the signaling server and STUN, and optionally, to a TURN.
- DataConnection: DataConnection (that is, the instance of DataConnection) represents a peer-to-peer connection, which is used to exchange the arbitrary data. Technically, it wraps RTCDataChannel.
- MediaConnection: MediaConnection (that is, the instance of MediaConnection) represents a peer-to-peer connection that is used to exchange MediaStream. Technically, it wraps RTCPeerConnection.
If a peer wants to establish DataConnection or MediaConnection with another peer, then it simply needs to know the other peer’s ID. PeerJS doesn’t give the other peer an option to accept or reject DataConnection. Also, in the case of MediaConnection, PeerJS doesn’t give the other peer an option to accept or reject MediaConnection, but MediaConnection will be inactive until it is activated programmatically by the other peer so that MediaStream can be transferred, otherwise MediaStream will not be transferred. So, we can write our own logic to let the other user accept or reject DataConnection or MediaConnecton, that is, as soon as DataConnection or MediaConnection is established, we can cancel it by asking the user for their opinion.
Now, we need to create a <video> tag where the video will be displayed, a button to connect to a peer, and also a text box to send message. Here is the HTML code to display all these:
<video id=”remoteVideo”></video>
<br>
<button onclick=”connect()”>Connect</button>
<br>
<input type=”text” id=”message”>
<button onclick=”send_message()”>Send Message</button>
Now as soon as the page loads, we need to connect to PeerServer and ICE servers so that other peers can talk to us, and also when a user clicks on the connect button, we can establish DataConnection and MediaConnection. The following is the code for this:
var peer = null;
window.addEventListener(“load”, function(){
var id = prompt(“Please enter an unique name”);
peer = new Peer(id, {key: “io3esxy6y43zyqfr”}); peer.on(“open”, function(id){
alert(“Connected to PeerServer successfully with ID: ” + id);
});
peer.on(“error”, function(err){
alert(“An error occured. Error type: ” + err.type);
})
peer.on(“disconnected”, function(){
alert(“Disconnected from signaling server. You ID is taken away. Peer-to-peer connections is still intact”);
})
peer.on(“close”, function(){
alert(“Connection to signaling server and peer-to-peer connections have been killed. You ID is taken away. You have been destroyed”);
})
peer.on(“connection”, function(dataConnection){ setTimeout(function(){
if(confirm(dataConnection.peer + ” wants to send data to you. Do you want to accept?”))
{
acceptDataConnection(dataConnection);
}
else
{
dataConnection.close();
}
}, 100)
})
peer.on(“call”, function(mediaConnection){ setTimeout(function(){
if(confirm(“Got a call from ” + mediaConnection.peer + “. Do you want to pick the call?”))
{
acceptMediaConnection(mediaConnection);
}
else
{
mediaConnection.close();
}
}, 100);
})
});
Here is how the code works:
- First we displayed a prompt box to take the ID as an input so that every peer can decide their own ID.
- Then we created an instance of Peer with ID and PeerServer cloud key. Here we didn’t provide signaling and ICE server’s URLs, therefore, PeerJS will use PeerServer cloud as the signaling server and Google’s public STUN server.
It will not use any TURN server. As soon as a Peer instance is created, the instance connects to the signaling server and registers the given ID.
- Then we attached five event handlers to the peer object.
- The open event is triggered when the connection to PeerServer was successful.
- The error event is triggered for errors on the peer object.
- The disconnected event is triggered when the connection with the signaling server is disconnected. The connection with the signaling server may get disconnected due to network problem or if you manually call the peer.disconnect() method. Once you are disconnected, your ID can be taken by someone else. You can try to reconnect with the same ID using the peer.reconnect() method. You can check whether peer is connected to the signaling server using the peer.disconnect Boolean property.
- The close event is triggered when peer is destroyed, that is, it cannot be used anymore, all MediaConnections and DataConnections are killed, connection with the signaling server is killed, the ID is taken away, and so on. You may want to manually destroy peer when you don’t need it anymore. You can destroy a peer using the peer.destroy() method.
- The connection event is triggered when some other peer establishes DataConnection with you. As I said earlier, DataConnection is established without further permission, but you can close it as soon as it’s established
if you want. Here we let the user decide if they want to continue or close DataConnection established by another peer. The event handler attached to the event receives an instance of DataConnection via the parameter that represents the currently established DataConnection.
- The call event is triggered when some other peer establishes MediaConnection with you. Here, we also let the user decide if they want to continue or close MediaConnection established by another peer. The event handler attached to the event receives an instance of MediaConnection via the parameter that represents the currently established MediaConnection.
- Here, in the call and connection event handlers, we asynchronously displayed the confirm popup boxes to prevent blocking the execution of the event handler that causes issues in some browsers, that is, blocking it fails to establish DataConnection and MediaConnection.
Now, let’s implement the acceptDataConnection() and acceptMediaConnection() functions so that we can display the text messages and remote MediaStream when other peer establishes DataConnection or MediaConnection with us. Here’s the code:
navigator.getUserMedia = navigator.getUserMedia || navigator.webkitGetUserMedia || navigator.mozGetUserMedia;
var myDataConnection = null; var myMediaConnection = null;
function acceptDataConnection(dataConnection)
{
myDataConnection = dataConnection;
dataConnection.on(“data”, function(data){
alert(“Message from ” + dataConnection.peer + “.\n” + data)
})
dataConnection.on(“close”, function(data){ alert(“DataConnecion closed”);
})
dataConnection.on(“error”, function(err){
alert(“Error occured on DataConnection. Error: ” + err);
})
}
function acceptMediaConnection(mediaConnection)
{
myMediaConnection = mediaConnection; mediaConnection.on(“stream”, function(remoteStream){
document.getElementById(“remoteVideo”).setAttribute(“src”, URL.createObjectURL(remoteStream)); document.getElementById(“remoteVideo”).play();
})
mediaConnection.on(“close”, function(data){
alert(“MediaConnecion closed”);
})
mediaConnection.on(“error”, function(err){
alert(“Error occured on MediaConnection. Error: ” + err);
})
navigator.getUserMedia({video: true, audio: true}, function(mediaStream) {
mediaConnection.answer(mediaStream);
}, function(e){ alert(“Error with MediaStream: ” + e); });
}
This is how the preceding code works:
- In the acceptDataConnection() function, we attached three event handlers to DataConnection. The data event is triggered when the other peer sends us data. The close event is triggered when DataConnection is closed. Finally, the error event is triggered when an error occurs on DataConnection. We can manually close DataConnection using the dataConnection.close() method.
- In the acceptMediaConnection() function, we attached three event handlers and transferred our MediaStream to the other peer. The stream event is triggered when other peer sends us MediaStream. The close event is triggered when MediaConnection is closed. Finally, we activated MediaConnection using the mediaConnection.answer() method by passing our MediaStream. After MediaConnection is activated, the stream event will be triggered.
We finished writing the code to handle MediaConnection or DataConnection established by another peer with us. Now we need to write a code to create MediaConnection and DataConnection that a user clicks on the connect button. Here is the code:
function connect()
{
var id = prompt(“Please enter other peer ID”); establishDataConnection(id); establishMediaConnection(id);
}
function establishDataConnection(id)
{
var dataConnection = peer.connect(id, {reliable: true, ordered: true});
myDataConnection = dataConnection; dataConnection.on(“open”, function(){
alert(“DataConnecion Established”);
});
dataConnection.on(“data”, function(data){
alert(“Message from ” + dataConnection.peer + “.\n” + data)
})
dataConnection.on(“close”, function(data){ alert(“DataConnecion closed”);
})
dataConnection.on(“error”, function(err){
alert(“Error occured on DataConnection. Error: ” + err);
})
}
function establishMediaConnection(id)
{
var mediaConnection = null;
navigator.getUserMedia({video: true, audio: true}, function(mediaStream) {
mediaConnection = peer.call(id, mediaStream);
myMediaConnection = mediaConnection; mediaConnection.on(“stream”, function(remoteStream){
document.getElementById(“remoteVideo”).setAttribute(“src”, URL.createObjectURL(remoteStream)); document.getElementById(“remoteVideo”).play();
})
mediaConnection.on(“error”, function(err){
alert(“Error occured on MediaConnection. Error: ” + err);
})
mediaConnection.on(“close”, function(data){
alert(“MediaConnecion closed”);
})
}, function(e){ alert(“Error with MediaStream: ” + e); });
}
Here is how the code works:
- First we asked the user to input another user’s ID.
- Then we established DataConnection. To establish a DataConnection with another user, we need to invoke the connect() method of the Peer instance with other peer’s ID. We also made DataConnection reliable and ordered. Then, we attached the event handlers. We also saw how data, close, and error events work. The open event is triggered when DataConnection is established.
- After establishing the DataConnection, we established MediaConnection. To establish MediaConnection, we need to call the call() method of the Peer instance. We need to pass MediaStream to the call() method. Finally, we attached the event handlers. The stream event will be triggered when the other user calls the answer() method of the MediaConnection instance, that is, when the MediaConnection is activated.
Now the last thing we need to do is write the code to send the message when a user clicks on the send message button. Here is the code for this:
function send_message()
{
var text = document.getElementById(“message”).value;
myDataConnection.send(text);
}
To send data via MediaConnection, we need to call the send() method of the MediaConnection instance. Here, we are sending a string, but you can pass any type of data including blobs and objects.
Now, to test the application, open the index.html page URL in two different browsers, devices, or tabs. I am assuming that you have opened the URL in two different devices. In each device, provide a different ID to identify the user. Then click on the connect button in any one device and enter the other peer’s ID. Now accept the request on the other device. Once this is done, both the devices will be able to display each other’s webcam video and microphone audio. You can also send messages between them.
Miscellaneous
At the time of writing this article, the WebRTC specifications were still not finalized. The overall idea of what WebRTC does and how WebRTC works has been finalized. It’s just that the APIs are still under development.
For example, WebRTC has introduced an alternative to the navigator. getUserMedia() method, that is, the navigator.mediaDevices.getUserMedia() method. At the time of writing this article, navigator.mediaDevices. getUserMedia() is not supported in any browsers. The difference between them is that the navigator.mediaDevices.getUserMedia() method is based on the promise pattern, whereas navigator.getUserMedia() is based on the callback pattern. At present, there is no plan to get rid of navigator.getUserMedia() due to the backward compatibility reason, but in future, navigator.getUserMedia() may be removed as WebRTC wants to implement all APIs using the promise pattern, therefore, it’s difficult to maintain multiple APIs that do the same thing.
Similarly, navigator.mediaDevices.enumerateDevice() is an alternative to MediaStreamTrack.getSources(), that is, navigator.mediaDevices. enumerateDevice() is based on the promise pattern.
Due to the fact that there are multiple APIs for the same feature, each with a different browser support, WebRTC provides a script called adapter.js, which is a shim to insulate websites from specification changes and prefix differences. You can find the shim at https://github.com/webrtc/adapter.
WebRTC has a GitHub repository where it puts a lot of example projects showing some of the things that can be built using WebRTC. You can find the repository at https://github.com/webrtc/samples. Just by looking at the examples and their source code, you can learn a lot more about WebRTC.
Summary
In this article, we discussed the fundamentals of WebRTC and PeerJS by creating a simple app. We discussed the various protocols, techniques, and other technologies that WebRTC uses to enable real-time peer-to-peer communication and read streams of physical media sources. We also saw an overview of PeerServer. Now you must be comfortable with building any type of WebRTC app using PeerServer cloud.
In the next article, we will build an advanced WebRTC app using a custom PeerServer.
Here are related articles if you wish to learn more advance topics for web development:
Best practices for securing and scaling Node.JS applications
Comprehensive overview of Angular 2 architecture and features
How Bootstrap 4 extensible content containers or Cards work
Comprehensive guide for migration from monolithic to microservices architecture
Comprehensive overview of Bootstrap 4 features for user interface customizations
Intro to functional reactive programming for advance js web development
Intro to real-time bidirectional communications between browsers and webSocket servers
Junior or senior web developers can also explore career opportunities around blockchain development by reading below articles:
Blockchain Developer Guide- Comprehensive Blockchain Ethereum Developer Guide from Beginner to Advance Level
Blockchain Developer Guide- Comprehensive Blockchain Hyperledger Developer Guide from Beginner to Advance Level